If you’ve ever uploaded a video to YouTube or wanted to share a clip with family or friends without the world being able to see it, you’ve probably come across the YouTube options of unlisting or making it private.
But what do these settings actually do, and which is right for you? Unlisted vs private YouTube videos: Let’s see what’s the difference.
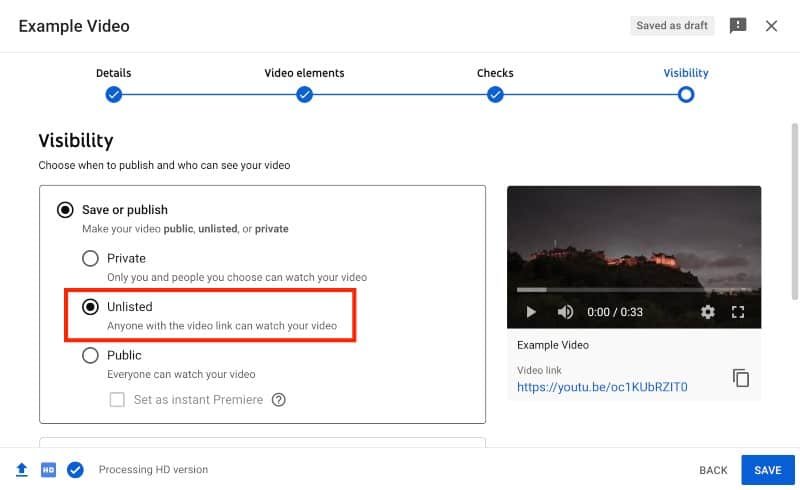
Unlisted YouTube videos cannot be indexed by YouTube, meaning they do not appear publicly on YouTube, however, anyone with the YouTube link can watch the video. Unlisted YouTube videos can also be embedded on external websites and viewed there. Private YouTube videos are only accessible by people who have been invited to watch the video via an email link. These videos do not appear anywhere on YouTube and they cannot be embedded on websites. The only way to access them is via an email invitation from the creator.
Now that you know what the difference between private and unlisted videos on YouTube is, let’s look at what exactly they are, how to upload unlisted vs private youtube videos, and why you might want to use one over the other.
What is an Unlisted YouTube Video?
An unlisted YouTube video is a mix between a public and a private video. These videos are not indexed by YouTube, this means they are basically invisible on the platform. Unlisted videos do NOT show up in subscribers’ feeds, on the home page, in search results, in suggestions, and in channel video tabs.
With unlisted videos, anyone with the URL or link can see (and share) your video. The only way unlisted videos can appear on YouTube is if someone has the link, or if they are included in public playlists. Unlisted videos can also be embedded on external websites (like your company page, sales pages, etc.) and you can share these videos directly with a link on social media, email, WhatsApp, your website, etc.
Some advantages of making an unlisted YouTube video are:
- You can easily share your video with many people with one link, without having it public on YouTube.
- Videos can be embedded directly onto your website. This basically allows you to use YouTube as a free video hosting service, without the video public.
- Great way to gather video feedback before making a video public. If the feedback is good, then you can make it public, if it’s not good, you can delete it and make changes.
- Sharing unlisted videos a few days before they are set to go live as “early access” is an easy way to get viewers to sign up for your email list, or even join your Patreon.
- You can tidy up your YouTube channel by unlisting old videos that aren’t relevant to your channel anymore. If you still want these videos to be publicly available, add them to public playlists. This way new subscribers that are there for your new content won’t see them, but anyone looking specifically for them can find them in your playlists tab.

What is a Private YouTube Video?
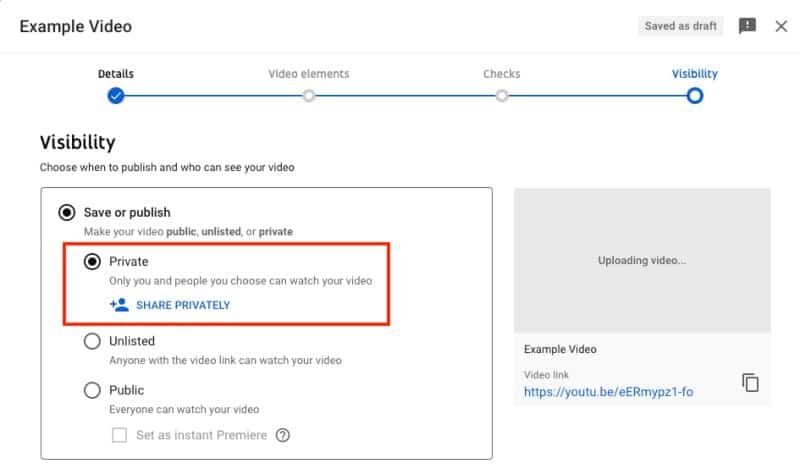
A private youtube video is the most hidden and secure form of video on YouTube. These videos are only visible to people who you invited to view the video. You can invite up to 50 people with YouTube accounts to view private YouTube videos.
This means you can only share it with email addresses that are linked with YouTube accounts (or recipients need to set one up). Viewers also need to be logged into their YouTube accounts to then view the video.
Private videos do NOT appear in subscribers’ feeds, on the home page, in search results, in suggestions, in channel video tabs, or in playlists. Also, people you invite to watch the video cannot send the link further, and private videos cannot be embedded on external websites or shared with a link.
Some advantages of private YouTube videos are:
- You can share internal videos privately with colleagues without risking them being shared or embedded somewhere.
- You can share private videos with family members and friends without worrying about the video being visible anywhere on YouTube or being shared unknowingly.
- Uploading videos to YouTube and making them private can help you save space on your devices. You can use YouTube as a free video storage platform.
How to Upload an Unlisted YouTube Video
If you have a video that you want to share with a large group of people easily, or if you offer “early access” to your newsletter subscribers, uploading your video as unlisted is a useful way of sharing it easily online and allowing it to potentially be set to public at a later date.
This is how to upload an unlisted video to YouTube:
- Log into YouTube Studio, or set up your channel if you have not done so already.
- In the top right, click create -> Upload videos.
- Drop the video files into the upload videos box, or choose the files by clicking the select files button.
- You can then fill out the video details and include video elements if you wish.
- Under the visibility tab, select “Unlisted”.
- Click save to publish your unlisted YouTube video.
- You can then copy and share the link as you please.

How to Unlist a YouTube Video
If you are cleaning up your YouTube channel and want certain videos to no longer show on your channel or be suggested to your subscribers and people who interact with your channel, the best thing to do is to unlist those videos.
This allows you to keep any external links to your channel from websites and people who have shared your videos while having your channel grow with more engaged viewers because only your current niche-related videos will be suggested to them.
If viewers see your videos that aren’t of interest to them, they will ignore them, and YouTube could interpret that as being the video is of poor quality, and will stop suggesting it to other people and your other videos may not be suggested to that particular subscriber either.
This is how to unlist a video on YouTube:
- Log into YouTube Studio.
- Select content from the menu on the left.
- Scroll to the video you want to unlist and under the “visibility” column click on public/private (depending on what visibility it had before).
- From the options list, select “Unlisted”.
- Click Publish to save your video as unlisted.
How to unlist multiple videos on YouTube at once:
- Log into YouTube Studio.
- Select content from the menu on the left.
- Select each video you want to unlist from the checkbox on the left. Or select the checkbox right at the top to select all of the videos on the current screen (10, 30, or 50, depending on how many rows are showing). Or once you’ve clicked the checkbox at the top, you can select all videos on your channel with the “Select all” option.
- When you’ve selected the videos you want to unlist, select the edit dropdown menu and click “Visibility”.
- In the next dropdown menu, select “Unlisted”.
- Click on the “Update Videos” button to save your changes. The update can take a couple of minutes, depending on how many videos you’re updating.
How to Upload a Private YouTube Video
An easy way to share a large video file, while maintaining good video quality, is to upload it to YouTube and set it as a private video. This could then be sent to colleagues for training, to family and friends, or to clear out some space on your smartphone.
This is how to upload a private YouTube video:
- Log into YouTube Studio, or set up your YouTube channel if you have not done so already.
- In the top right, click create -> Upload videos.
- Drop the video files into the upload videos box, or choose the files by clicking the select files button.
- You can then fill out the video details (video elements are disabled for private videos, so you can skip that).
- Under the visibility tab, select “Private”.
- If you want to share the video with anyone, you can do so under the share privately option. Just add their Google email addresses, select notify by email, and then as soon as you save the video file, they will be notified.
- Now you can click save to publish your private YouTube video.

How to Make a YouTube Video Private
If you already have a public or unlisted video on YouTube and want to remove it from being seen across the internet (if someone hasn’t already downloaded it), then you can set it to private. Then only people you invite can see the video, and if you ever decide to make it public or unlisted again, you can do so easily, all without losing any of the views and needing to re-upload the video.
If you’ve been wondering how to make a youtube video private after uploading, this is how you do it:
- Log into your YouTube Studio.
- Select content from the menu on the left.
- Scroll to the video you want to make private and under the “visibility” column click on public/unlisted (depending on what visibility it had before).
- From the options list, select “Private”.
- Click Publish to save your video as Private.
How to make multiple videos on YouTube private at once:
- Log into YouTube Studio.
- Select content from the menu on the left.
- Select each video you want to make private from the checkbox on the left. Or select the checkbox right at the top to select all of the videos on the current screen (10, 30, or 50, depending on how many rows are showing). Or once you’ve clicked the checkbox at the top, you can select all videos on your channel with the “Select all” option to make all videos on your channel private.
- When you’ve selected the videos you want to make private, select the edit dropdown menu and click “Visibility”.
- In the next dropdown menu, select “Private”.
- Click on the “Update Videos” button to save your changes. The update can take a couple of minutes, depending on how many videos you’re updating.

P.s. if you want to share these videos privately, you will then have to do so individually.
Final thoughts on Unlisted vs Private YouTube Videos
Those are the differences between unlisted vs private YouTube videos.
There are a number of useful reasons to use either for your YouTube channel, from growing your channel, sharing confidential information, or even just using YouTube as a video hosting platform.
As you can see, the process of creating and sharing these different types of YouTube videos is not that complicated and opens up a host of new features you can take advantage of.
